Growing, sharing, preserving and cooking seem to be siblings to me.
As soon as i ventured out of my comfort zone of flowers into vegetables and herbs, the latter 3 seemed to be the next obvious option. As someone who hates wasting things, i am constantly looking for best ways to use what i grow in my garden. While, this has definitely added to my intelligence quotient( 😛 ), it has also helped feed my skincare obsession( my second love) in the best possible manner. As summers arrive, the first thing i do is harvest some Aloe Vera leaves and whip up a batch of my tried and tested Aloe Vera gel.
Aloe Vera, known as ghritkumari, in Hindi, is almost a wonder plant. Even though i am confident of even a 3-yr old being able to list out it’s benefits, i will repeat what i know, for those of you living under a rock:
- Soothes sunburn, reduces tan and gives you clear radiant skin
- Helps hydrate skin
- Soothes and itchy scalp and reduces dandruff
- Promotes hair growth
- Regular use gives silky, shiny, hydrated hair
If consumed,
- It boosts immunity
- Reduces inflammation
- Promotes healthy digestion
- Aids weight loss(combined with a sensible diet)
No wonder, a batch of this miracle always exists in my fridge. While i do not consume it regularly(it tastes bitter), i never forget to apply the gel-ish liquid on my skin and hair.
Making it is easy, quick and simple.
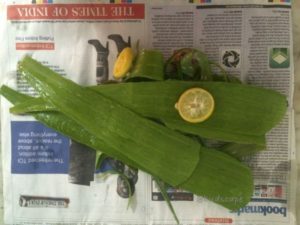
- Harvest some fleshy leaves and keep them in a container for 15-20 mins to drain out the
yellow liquid. - Wash the leaves and cut off a little from the top and bottom.
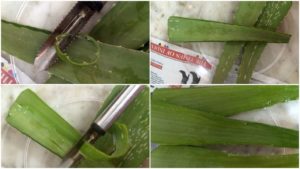
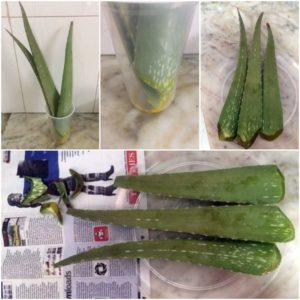 Take a peeler and remove the thorns.
- Peel off the skin from the flat side. It is extremely easy to do this with a vegetable
peeler.
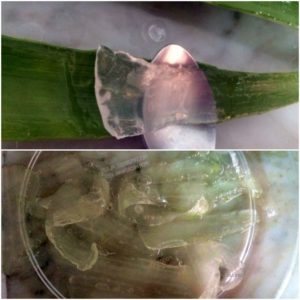
- Keep the leaves flat on a plate and scrape off the gel with a spoon. You can also peel
the other side and chop the gel but i find it easier this way since it is extremely
slippery.
- Collect the gel into a blender and add the juice of a lemon. I used 1 medium lemon for 3
medium sized leaves. Lemon helps preserve the gel and has additional benefits for skin - Blend it on high till it turns into a liquid. The consistency will be nothing like the
gels we get in market but they are far from the real thing.
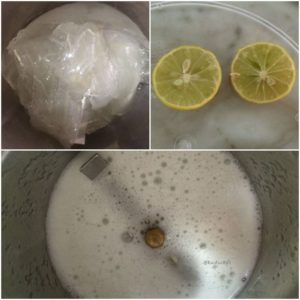
- It will foam up, wait for it to settle down a bit.
- Pour into a bottle and store in the fridge.

What you get is a slimy gel-ish liquid but this is the real thing that actually works.
You may also add some essential oils(peppermint, lemon) if you wish to but i do not. In-fact, you may even skip adding lemon and replace it with citric acid to increase shelf life.
Shortcut: Clean and chop the leaves with the skin. Blend it all and filter. Done! It will have a greenish tinge though.
What about the trash generated? Compost it indoors! What’s the EcoBin for?
Since i am obsessed with aloe gel in summers, i also own a few from known Indian brands (Patanjali, Guardian Pharmacy, The Nature’s Co.) that i use while travelling but nothing comes close to this.
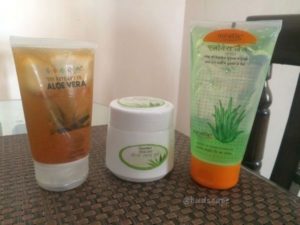
(THE NATURE’S CO. ALOE VERA GEL , GUARDIAN PHARMACY ALOE VERA GEL,
PATANJALI ALOE VERA GEL)
The best i have come across till date may be the gel from The Nature’s Co. which claims to be all-natural and also costs a bomb. It does have a juice- gel type consistency with added benefits of peppermint and i like it the most out of the 3. Patanjali and Guardian pharmacy Aloe Vera gels have an extremely artificial texture and are sticky in an uncomfortable way.
How do i use this gel?
- Apply it to slightly damp skin after bath or sun-exposure(Clean the skin of sweat before
applying). - Use it as a mixing medium for skin and hair packs.
- Apply a thick layer as a mask for hydration and wash off after half an hour.
- Massage onto the scalp and hair pre-shampoo.
Precautions:
Do not lick your lips or face after applying this gel. It is extremely bitter.
Do not expose skin to sun, a few hrs after applying this gel. It may darken the skin.
So, that’s all i know about Aloe Vera and i urge you to try this gel once. You will be hooked, i promise!
Till then,
Happy Gardening
CYA!
JOIN OUR GARDENING COMMUNITY ON FB FOR MORE TIPS AND TRICKS!
https://www.facebook.com/groups/1629966650655491/
